Adding a website to cPanel is a straightforward process that can be completed in just a few steps. Whether you’re setting up a new website or migrating an existing one, cPanel offers a simple and intuitive interface that makes it easy to manage all aspects of your web hosting account.
Here’s a step-by-step guide to adding a website to cPanel:
Step 1: Log in to cPanel The first step is to log in to your cPanel account. You can do this by entering your cPanel login details in your web browser, which should take you to the cPanel dashboard.
Step 2: Navigate to the “Domains” section Once you’re logged in to cPanel, you’ll need to navigate to the “Domains” section. This can typically be found in the main menu of your cPanel dashboard.
Step 3: Add a domain In the “Domains” section, you’ll see an option to “Add Domain.” Click on this button to begin the process of adding a new domain to your cPanel account.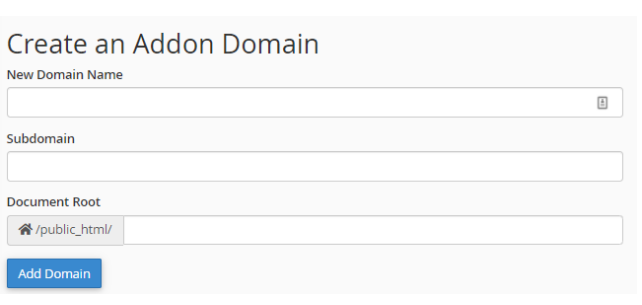
Step 4: Enter the domain name In the “Add a Domain” section, you’ll be prompted to enter the domain name that you want to add to your cPanel account. This can be a domain that you’ve already registered, or a new domain that you’re setting up for the first time.
Step 5: Choose the document root Once you’ve entered the domain name, you’ll need to choose the document root. This is the directory where your website files will be stored. By default, cPanel will suggest a document root based on the domain name that you’ve entered, but you can change this if you prefer.
Step 6: Create an FTP account (optional) If you want to be able to upload files to your website using an FTP client, you’ll need to create an FTP account. This can be done in the “FTP Accounts” section of cPanel.
Step 7: Set up email (optional) If you want to create email accounts associated with your new domain, you can do so in the “Email Accounts” section of cPanel. This will allow you to create email addresses such as [email protected].
Step 8: Install a CMS (optional) If you’re using a content management system (CMS) such as WordPress, you can use cPanel’s “Softaculous” installer to easily install the CMS on your new domain.
Step 9: Test your website Once you’ve added your new domain to cPanel, you should be able to test your website by visiting the domain in your web browser. If everything is set up correctly, you should see your website appear.
In conclusion, adding a website to cPanel is a quick and easy process that can be completed in just a few simple steps. With cPanel’s intuitive interface and powerful features, you can easily manage all aspects of your web hosting account, from domain management to email and website setup. Whether you’re setting up a new website or migrating an existing one, cPanel is a reliable and user-friendly choice for all your web hosting needs.
Read More: Types of SSL Certificates